When buying clothes online, compare your body measurements with a body size chart, and compare a well-fitting item you own with garment measurements. Check whether each number is a flat width or a full circumference before doing any calculations. A chest width of 52 cm and a chest circumference of 104 cm can describe the same simple shirt.
The useful question is what the numbers measure. Once that is clear, you can judge the room, length and shape you actually want instead of trusting a familiar S, M or L.
This guide focuses on everyday adult tops, shirts, dresses and trousers. Specialist garments such as bras, compression wear and protective clothing need their own fitting guidance.
Three things a size chart might tell you
#A body measurement describes you: for example, the circumference around your chest or hips. A finished garment measurement describes the clothing: perhaps its width across the chest, shoulder width or inside-leg length. The size label groups an item into the seller's sizing system.
Keep those three records separate. A body chart showing a chest range does not promise that the shirt itself has those dimensions. Equally, a shirt's flat width does not tell you its intended body size without information about the design and fit.
| What the page says | What to compare it with | What to clarify |
|---|---|---|
| Body chest, bust, waist or hip | Your corresponding body measurement | Where the seller wants you to measure |
| Garment chest or pit-to-pit width | The same flat measurement on a similar item | Whether it is width or circumference |
| Finished chest circumference | A comparable garment circumference | Whether the item is measured relaxed |
| Sleeve or body length | An existing garment measured from the same starting point | Shoulder, neck or centre-back starting point |
| S, M, L or a numbered size | That product's own chart | Market, cut and any separate length option |
If the heading only says “measurements,” look for a diagram or explanation before choosing. A number without units and a measuring method is incomplete information.
Read the chart before reaching for the tape
#Open the size guide attached to the exact product. A general brand chart may describe bodies, while a product-specific chart describes the item. Both can be useful, but they answer different questions.
Check the units first. Keep all your notes in centimetres or all in inches while comparing. If conversion is necessary, one inch equals 2.54 cm. Avoid repeatedly converting rounded numbers; record the original figure beside the conversion.
Next, look for words such as “body,” “finished,” “laid flat,” “circumference,” “relaxed” or “stretched.” Also check the illustrated measuring points. A sleeve measured from the centre back includes a different path from one measured from the shoulder seam. Identical numbers from those methods do not mean identical sleeves.
Finally, read the fit description. Fitted, regular, relaxed and oversized describe an intended look, but they are not a shared numerical scale. Treat them as context for the measurements. A model's height and size can help you understand styling, but they do not replace a chart for your body and preferences.
Take a small, useful set of body measurements
#Use a flexible measuring tape and follow the retailer's diagram. For common body charts, chest or bust is measured around the fullest part, waist around the natural waistline, and hips around the fullest part of the bottom. Keep the tape level around the body without squeezing it into the skin.
Stand normally and breathe comfortably. Measuring while holding your breath or pulling the tape tight creates a target that may feel unpleasant during an ordinary day. If possible, use a mirror or ask someone to check that the tape has not slipped down at the back.
Write down what each measurement represents. “Waist at natural waistline” is more useful than “waist.” A lower trouser waistband sits at a different place, so its measurement should not be treated as an exact match for your natural waist.
You do not need to collect every possible dimension. Start with the measurements requested by the product chart, then add the area that usually causes trouble. For example, if trousers fit at the waist but feel tight when sitting, a waist measurement alone is not resolving your problem.
Use current measurements. Clothes are being chosen for your body now, and the size label is just a shopping reference.
Make one reference garment do some work
#Choose an item you actually enjoy wearing, in a similar category, material and fit. A roomy sweatshirt is a poor reference for a fitted woven shirt. A comfortable shirt with a similar construction is much more useful.
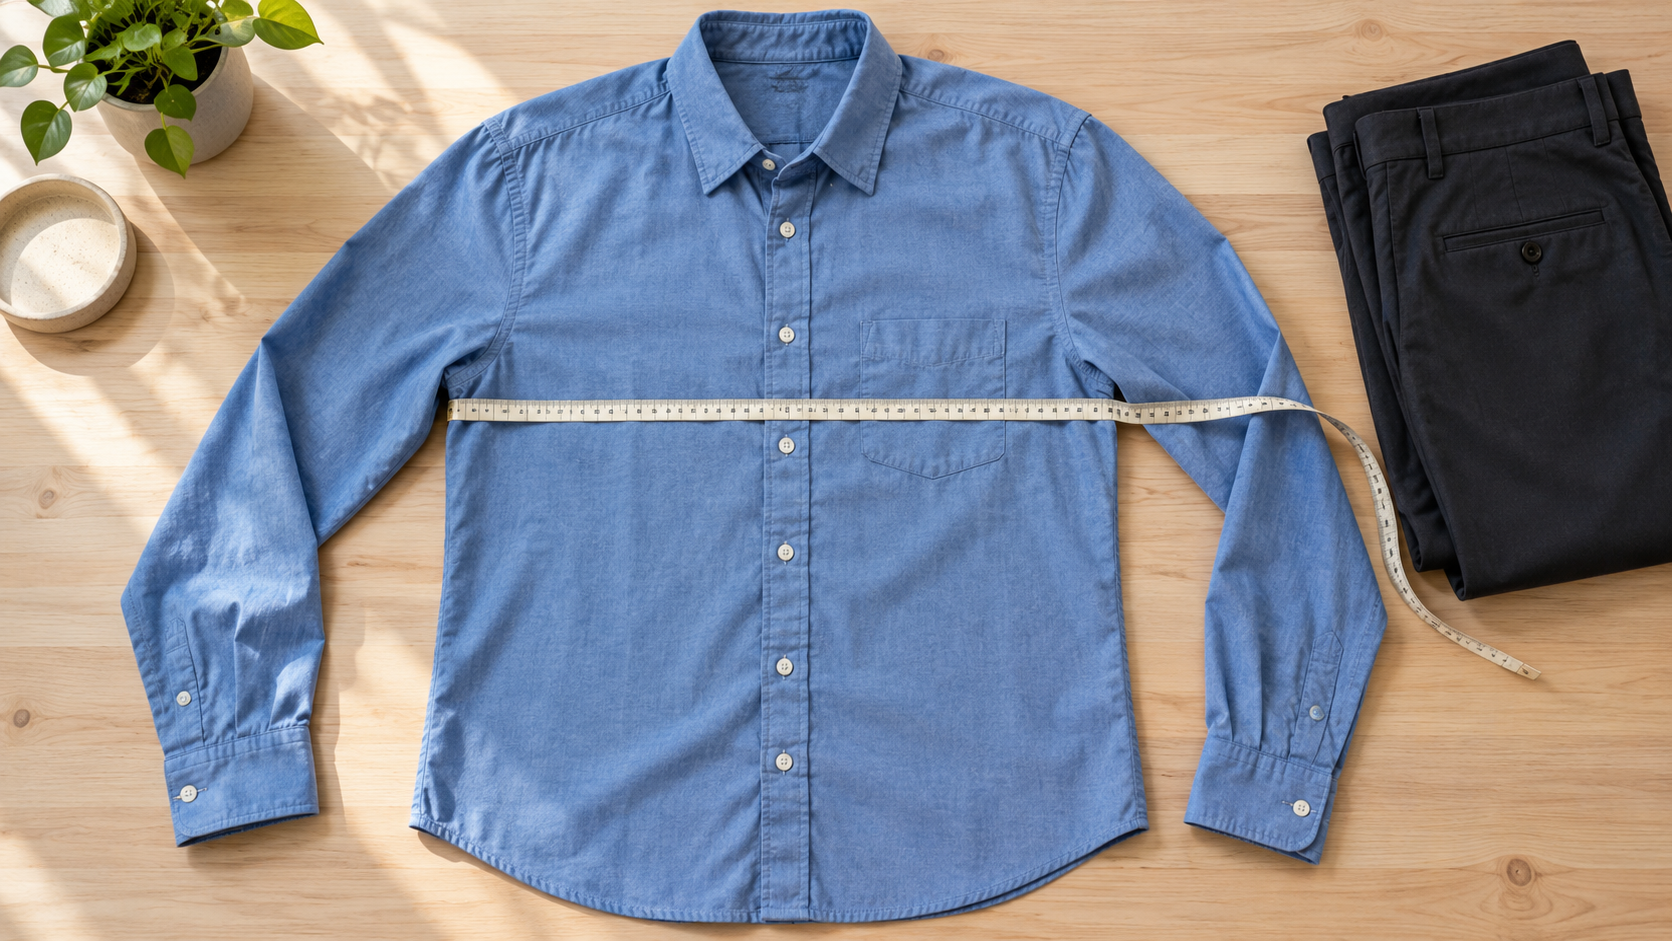
Lay it on a firm, flat surface. Fasten the buttons or zip where appropriate, settle the seams and smooth out folds without pulling the fabric wider. Then copy the seller's measuring method as closely as you can.
For a straightforward top, useful reference points often include chest width, body length, shoulder width and sleeve length. Record the starting point for length: centre back, shoulder or neckline. Follow the product's diagram rather than assuming all retailers use the same position.
Measure twice if a result looks surprising. A sleeve folded underneath, a twisted side seam or a different starting point can create a difference that looks like a sizing issue.
When doubling a flat width helps
#For a simple garment measured straight across from one side to the other, doubling a flat chest or waist width can give a useful approximate circumference. Do this only when the seller's method and the garment's construction support that interpretation.
Do not double a figure already labelled circumference. Do not double length measurements. Curved waistbands, gathers, wraps, shaped panels and unequal front and back sections also need more care than a quick multiplication.
For shopping, comparing two flat widths measured the same way is often easier than converting either into a circumference. Keep the conversion for situations where it is actually needed.
Understand ease without memorising a magic number
#Ease is the difference between a garment's finished dimensions and the corresponding body dimensions. Some room allows movement; additional room can create the intended silhouette. Those jobs are often called wearing ease and design ease.
A non-stretch shirt needs to let you move, reach and sit. A deliberately roomy shirt has more fullness for its appearance too. That is why choosing a woven shirt with exactly your body circumference is not a sensible universal rule.
There is no single extra number to add to every item. The required room changes with the material, cut, body area, layers and your comfort preferences. Even a generous chest measurement cannot describe the whole fit if the shoulders or sleeves feel restrictive.
Some close-fitting stretch garments use negative ease: their relaxed dimensions are smaller than the body, and the fabric stretches when worn. That does not make them incorrectly sized. It does mean that comparing a stretchy top with a non-stretch shirt will be misleading.
Stretch also does not automatically mean tight. A knit garment can be designed to sit loosely. Use the product's intended fit and a similar reference item instead of a rule that all knits should be smaller than the body.
A worked example: choosing between two shirts
#Here is a hypothetical comparison, not a recommendation for a particular body size or brand. Suppose your favourite non-stretch shirt feels comfortable at the chest and has the length you want.
| Measurement, using the same method | Your reference shirt | New shirt A | New shirt B |
|---|---|---|---|
| Flat chest width | 55 cm | 53 cm | 56 cm |
| Body length from the same point | 70 cm | 69 cm | 72 cm |
| Shoulder width | 44 cm | 43 cm | 45 cm |
Shirt A is narrower across the chest and shoulders. If your reference already feels just right, A deserves caution. Shirt B provides a little more width, but it is also longer. Neither column supplies an automatic winner.
Now connect the differences to your preference. If you want a slightly roomier shirt and like a longer hem, B looks more promising. If you need a shorter shirt, ask whether another cut gives the chest room without the added length. Buying A simply because its length is closer could leave you with the original fit problem somewhere else.
If the chest method supports doubling, the 2 cm flat-width difference between the reference and shirt A represents approximately 4 cm around the garment. Small-looking table differences can matter. This arithmetic describes the comparison; it does not predict exactly how either shirt will feel.
Use a short decision note: “B looks closer to my preferred room, but check the longer hem and sleeve measurement.” That is more useful than recording only “order large.”
Trousers need more than the waistband
#For trousers or jeans, compare a similar pair that fits comfortably. Look at the waistband, hips or seat, rise, thigh and inseam where those measurements are available. You may not need every figure, but focus on the area where previous pairs have failed.
Inseam is the inside-leg measurement from the crotch seam to the hem on the garment. Rise describes the distance from the crotch area towards the waistband; front and back rise are different measurements. Follow the seller's diagram for the precise path.
Two pairs can have similar waistband measurements and still sit differently because their rise and shape differ. Equally, matching the inseam does not guarantee the same overall silhouette. A wide leg and a tapered leg can meet the shoe differently even at a similar length.
Suppose, in another hypothetical example, your reference trousers are comfortable through the seat but too long. A new pair matches their waist and seat measurements and has a shorter inseam. That is a more targeted comparison than choosing a smaller overall size to shorten the legs.
For an elastic waist, check whether the listing gives relaxed, stretched or body dimensions. The relaxed waistband alone does not describe the full wearing fit, and a stretched maximum should not be treated as a comfort target. Ask for clarification if the description leaves you guessing.
What to do when your measurements cross sizes
#It is common for different body measurements to point to different rows. First check whether you are reading a body chart or garment chart, then identify which part of this particular design needs to fit accurately.
A fitted dress may require you to consider both the bust and hips. A loose skirt with an adjustable waist presents a different decision. A lined jacket introduces another fit question if you intend to wear it over knitwear. The right comparison follows the garment, rather than a blanket instruction to always size up or down.
If the body chart puts you in two rows, finished measurements may help you understand the available room. Ask the seller about the relevant area instead of averaging the two size labels. A middle number invented from the chart does not create a middle-sized garment.
Where the shape clearly does not suit your requirements, try another cut or proportion option. Petite and tall ranges can change proportions as well as total length; check the brand's own explanation. A different range may help when simply moving up a size adds width you do not want.
Know when the information is too uncertain
#Measurements reduce guesswork, but they cannot show every aspect of fit. Lining, armhole shape, stiffness, drape and the way a garment moves still matter. A well-matched reference improves the comparison without becoming a guarantee.
Be especially careful with a listing that combines a vague size label, no chart and a difficult return arrangement. For secondhand clothes, ask for measurements of the actual item using a clear method. The label alone cannot tell you whether that specific garment has been altered or changed through wear and care.
When a number appears inconsistent, ask a precise question: “Is the chest figure the flat armpit-to-armpit width, measured with the shirt buttoned and unstretched?” For trousers, you might ask whether the waist is measured relaxed and request the inseam and front rise.
Do not resolve uncertainty by assuming clothes will shrink or stretch into place. Check the care label and product guidance, and choose based on the available evidence. If the seller cannot explain the measurements, passing on the item can be the practical decision.
Save a measurement note you can reuse
#Keep separate notes for your body and a few reliable garments. This simple format makes the next purchase easier:
- Body record: date, units, measurements and the body points used.
- Reference item: description, material, cut and why you like its fit.
- Garment record: flat widths and lengths, with measuring start and end points.
- Product comparison: differences that matter and any unanswered questions.
- Purchase decision: suitable, ask the seller, or skip.
For example: “Blue woven shirt; comfortable sitting and reaching; chest 55 cm flat; length 70 cm from centre back; prefer no shorter than this.” Keep its actual size label as an extra reference rather than the main conclusion.
When the new item arrives, try it with the layers and shoes you plan to wear. Sit, reach forward and walk around while following the seller's return conditions. If it feels wrong, record where: chest, upper arm, seat, waist position or length. That detail helps you choose a better cut next time.
The goal is a small set of measurements you understand and can compare consistently. Start with the chart type, match the method, then judge the differences against clothes you already find comfortable.