If you have ever tried making homemade falafel by opening a can of cooked chickpeas, mashing them in a bowl, forming patties, and dropping them into a pan of hot oil, you almost certainly watched in horror as those patties completely dissolved into a greasy, bubbling swamp of chickpea sludge within thirty seconds.
That heartbreaking mess is the single most common tragedy in home Mediterranean cooking. It happens because nearly every amateur cook assumes falafel is made from cooked beans. In reality, authentic Middle Eastern falafel is never made from cooked chickpeas. It is made from raw dried chickpeas that have been soaked in cold water for twenty-four hours until swollen, ground raw into a coarse meal, and fried raw in hot oil.
The science behind this rule is simple starch physics. When chickpeas are cooked in water, their natural starches absorb liquid, swell, and gelatinize, losing all ability to bond with other proteins. When raw soaked chickpea meal hits 365°F oil, however, those raw starches instantly gelatinize under intense heat, creating an impenetrable, shatteringly crisp outer crust that locks the patty together and prevents hot oil from penetrating the interior.
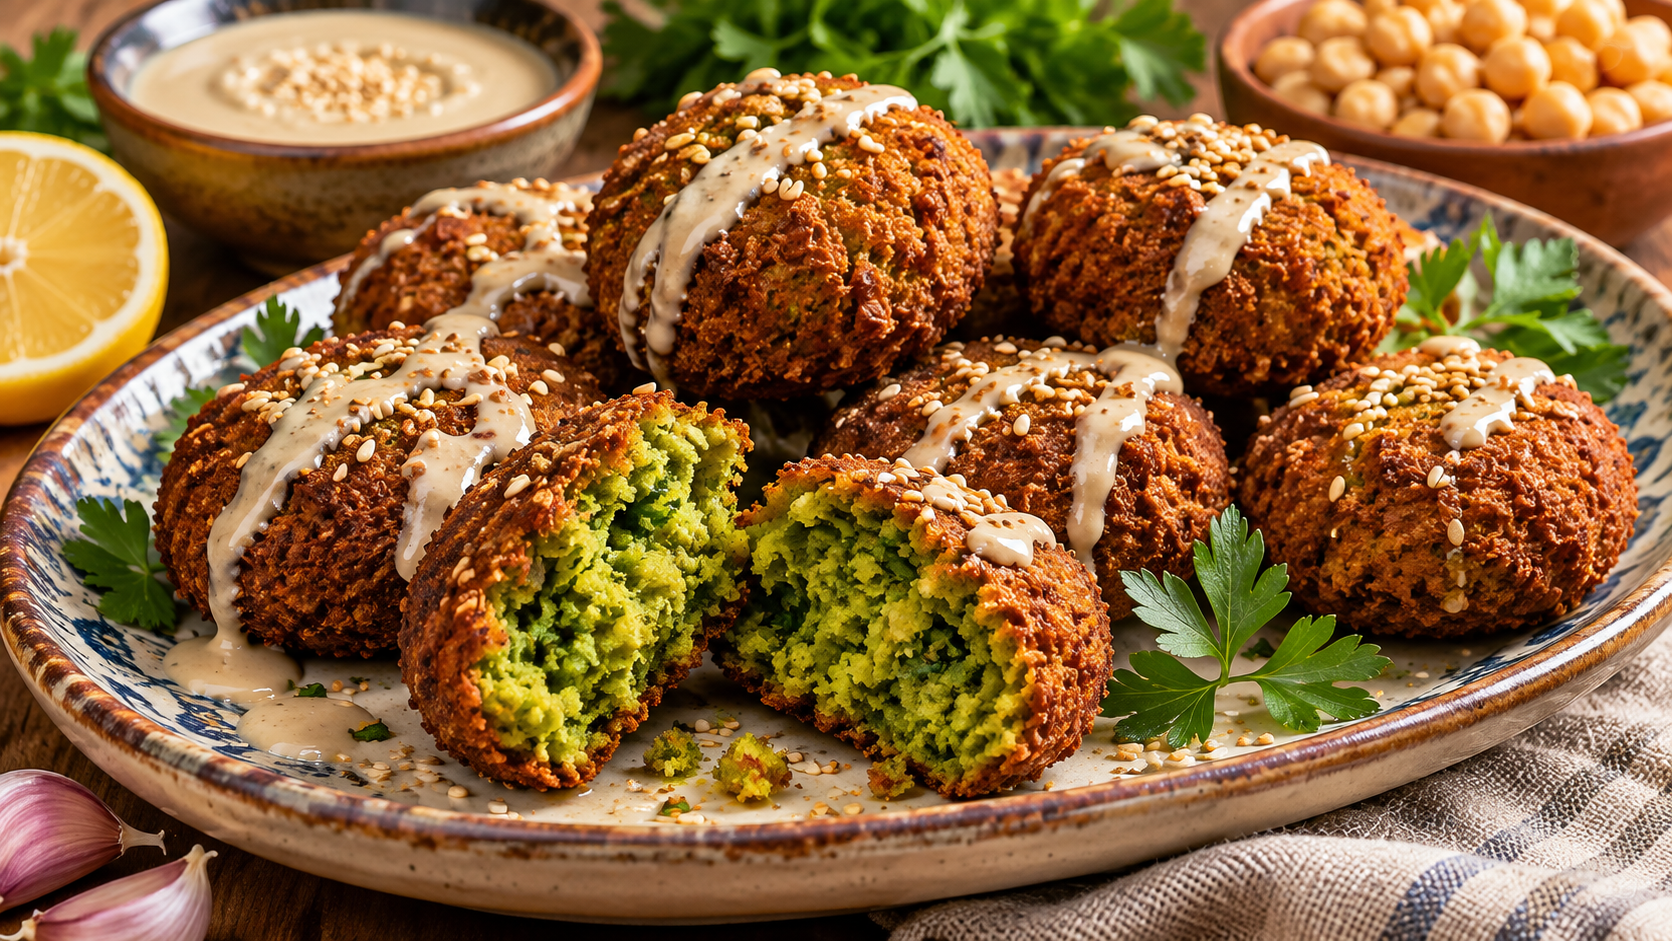
When executed properly, an authentic Levantine falafel ball has a deep, golden-brown crunchy shell on the outside, while the inside is an ethereal, vibrant emerald-green cloud of herbs that tastes nutty, fragrant, and wonderfully moist.
This masterclass details legume soaking chemistry, pulse sizing, fresh herb ratios, chemical aeration, and oil frying thermodynamics.
The Canned Chickpea Fallacy: Why Cooked Legumes Disintegrate
#The most important culinary rule of falafel is absolute: never use canned chickpeas, and never boil dried chickpeas before grinding.
To understand why, examine the cellular structure of a dried chickpea:
- Raw Dried Chickpea Starch: A raw dried chickpea is a dense, hard seed packed with un-gelatinized amylose and amylopectin starches alongside plant proteins. When soaked in cold water for 18 to 24 hours, the seed absorbs water into its cell walls through osmosis, doubling in physical size while remaining raw, firm, and crunchy. The starches inside remain completely uncooked.
- The Hot Oil Gelatinization Lock: When raw soaked chickpea particles are pulsed and dropped into 365°F oil, the moisture at the surface rapidly converts to steam. That steam forces the raw starches at the perimeter to gelatinize instantaneously, forming a cohesive, rigid protein-starch matrix. This matrix acts like a natural biological cage, holding the patty in a perfect spherical shape without needing eggs, breadcrumbs, or wheat flour.
- Why Canned Chickpeas Fail: Canned chickpeas (and boiled chickpeas) are already fully cooked and saturated with water. Their starches have already gelatinized, burst, and cooled. Because the starch has no remaining binding capacity, the patty has zero structural defense against hot frying oil. The moment oil hits the patty, boiling steam from the excess water blows the mixture apart, turning your frying pan into a sandy soup of disintegrated mush.
Buy a bag of dry, raw chickpeas from the dried bean aisle. If you do not have raw dried chickpeas in your pantry, make hummus instead; you cannot make authentic falafel today.
The 24-Hour Cold Soak Protocol
#Proper hydration of raw dried chickpeas takes time and patience:
- The Volume Ratio: Place two cups (approximately 400 grams) of dry raw chickpeas into a large mixing bowl. Dried chickpeas expand to more than double their original volume as they hydrate. Add at least three times their volume in cold, filtered tap water—roughly six to eight cups of water.
- The Baking Soda Tip: Add half a teaspoon of baking soda (sodium bicarbonate) to the soaking water. Baking soda creates a mildly alkaline environment that weakens the outer pectin skins of the chickpeas, allowing water to penetrate deep into the dense core of the legumes evenly.
- The Duration: Let the chickpeas soak on your kitchen counter at room temperature for a minimum of 18 hours, and ideally 24 hours.
- The Hydration Test: You will know the chickpeas are properly soaked when you pick up an individual chickpea and bite down on it with your front teeth. It should snap cleanly in half like a raw peanut or fresh green pea, with no hard, chalky, un-hydrated white dot in the dead center.
- Draining and Drying: Pour the soaked chickpeas into a colander and rinse them thoroughly with fresh cold water to wash away residual baking soda. Shake the colander vigorously, then spread the chickpeas out on clean kitchen towels for 15 minutes. Excess surface water creates steam splatters in your food processor and dilutes the binding starches.
The Emerald Green Formula: Parsley, Cilantro, and Aromatics
#In street stalls from Beirut to Jerusalem, the hallmark of top-tier falafel is an astonishingly vibrant, emerald-green interior when you crack the crunchy golden crust open.
That bright green color is not food coloring; it comes from massive, generous bundles of fresh herbs:
- The Fresh Herb Ratio: For two cups of raw soaked chickpeas, use a massive mountain of fresh flat-leaf Italian parsley (one large bunch) and fresh cilantro (one large bunch). Do not use curly parsley, which has tough, papery leaves and very little essential oil.
- Stems vs Leaves: Wash the herbs thoroughly and spin them completely dry in a salad spinner. Chop off the thick, woody bottom two inches of the stems, but keep the tender upper stems attached to the leaves. The tender stems are packed with aromatic herbal juice and moisture that keeps the falafel interior juicy without becoming soggy.
- The Aromatics: Add half a medium yellow onion (roughly chopped), four to five plump cloves of fresh garlic, and half a green serrano or jalapeño pepper for subtle vegetal warmth without aggressive capsaicin burn.
- The Spice Blend: Authentic Levantine falafel relies on warm, toasted earthiness. Add one tablespoon of freshly ground toasted cumin, one tablespoon of freshly ground coriander seed, one teaspoon of coarse sea salt, half a teaspoon of freshly ground black pepper, and a quarter teaspoon of ground cardamom. Cardamom is the secret weapon of Damascus street vendors; a subtle whisper adds an exotic, floral perfume that elevates falafel from ordinary to unforgettable.
The Pulse Protocol: Gritty Sand vs Gummy Hummus
#The mechanical processing of the falafel mixture is where most home cooks stumble. The goal is to chop the raw chickpeas into uniform, microscopic granules the size of coarse sea sand or fine bulgur wheat—not a smooth paste.
- The Workhorse: Use a heavy-duty 12-cup or 14-cup food processor fitted with a sharp multi-blade. Do not attempt this in an upright blender or smoothie maker, which requires liquid to pull food down, turning the mixture into soup.
- Process in Two Batches: Unless you have an industrial 20-cup commercial machine, process the ingredients in two separate, equal batches. Overcrowding a domestic food processor causes the chickpeas at the bottom near the blade to pulverize into baby food while the chickpeas at the top remain completely whole.
- The Pulse Rhythm: Place half the soaked chickpeas, half the herbs, half the onion, garlic, and spices into the food processor bowl. Pulse the machine in short, sharp one-second bursts—roughly 15 to 20 pulses. Stop the machine, remove the lid, and scrape down the sides of the bowl with a rubber spatula.
- The Granular Test: Repeat with another 10 to 15 pulses until the mixture is finely and uniformly minced. Pinch a small clump between your thumb and forefinger. It should feel granular and sandy, like moist coarse cornmeal or couscous. If you see whole half-chickpeas rolling around, pulse a few more times.
- The Hummus Danger: Never let the food processor run continuously. Continuous blending heats up the blade, pulverizing the chickpeas into a smooth, wet puree. A smooth puree produces dense, gummy, rubbery falafel that sinks like a brick in hot oil. Gritty texture creates interior air pockets, ensuring a light, crumbly, fluffy bite.
The Aeration Chemistry: Baking Powder and Baking Soda Synergy
#Once your granular green mixture is transferred into a large mixing bowl, you must incorporate the leavening agents that give falafel its signature cloud-like lift:
- Baking Powder: Add one teaspoon of double-acting baking powder. Baking powder reacts twice: first when it contacts the moisture of the herbs and onion, and second when it hits the searing heat of the frying oil, expanding microscopic carbon dioxide bubbles throughout the crumb.
- Baking Soda: Add half a teaspoon of baking soda. Baking soda accelerates surface browning (the Maillard reaction) in the frying oil, ensuring a deeply caramelized, dark golden crust in under four minutes while keeping the interior crumb light.
- Chickpea Flour (The Optional Safety Net): If your onions were exceptionally juicy and the mixture feels slightly too wet to hold a firm ball, sift in two tablespoons of raw chickpea flour (besan). Chickpea flour absorbs excess surface water without introducing wheat gluten, preserving both authentic chickpea flavor and gluten-free integrity.
The Compulsory Rest: Why Chilling Is Mandatory
#Never attempt to fry freshly pulsed falafel dough immediately.
Cover the mixing bowl tightly with plastic wrap and place it in the refrigerator for at least one hour, or up to four hours.
This resting phase is essential for two physical reasons:
- Starch Hydration Equilibrium: Chilling gives the tiny, pulverized chickpea granules time to absorb the flavorful juices from the minced onions, garlic, and herbs, softening their edges and creating a natural, cohesive cling.
- Thermal Firming: Cold fat and vegetable fibers stiffen in the refrigerator, allowing you to shape tight, clean patties that hold their structural integrity effortlessly when dropped into hot oil.
| Phase / Ingredient | Recommended Specification | Primary Function | Amateur Mistake |
|---|---|---|---|
| Raw Dried Chickpeas | 400g (soaked 24 hrs with baking soda) | Provides ungelatinized starches for structural binding | Using canned cooked chickpeas that disintegrate |
| Fresh Herbs (Parsley & Cilantro) | 1 massive bunch of each (leaves & upper stems) | Delivers bright emerald interior and grassy aroma | Using dry herbs or discarding stems completely |
| Food Processor Technique | Intermittent 1-second pulses (approx 30 total) | Yields coarse gritty meal with interior air pockets | Running continuously creates dense gummy paste |
| Leavening Blend | 1 tsp baking powder + 1/2 tsp baking soda | Expands interior gas bubbles and accelerates browning | Skipping leavener produces heavy, leaden pellets |
| Dough Resting Time | 1 hour minimum in refrigerator | Equalizes moisture and firms mixture for shaping | Frying immediately leads to crumbly edges |
| Frying Oil Temperature | 365°F (185°C) maintained with thermometer | Instant crust seal prevents oil absorption | Frying below 350°F causes oily greasiness |
Shaping Mechanics: The Traditional Scoop vs Two Spoons
#When shaping falafel, remember this golden rule: never pack or compress the mixture tightly like a dense meatball. Aggressive compression squeezes out trapped air pockets, turning the interior into a heavy, hard lump.
- The Traditional Tool (Aleb Falafel): Professional Levantine falafel vendors use a specialized brass or stainless steel spring-loaded scoop (aleb falafel). You pack the cavity loosely with the green mixture, scrape the top flat with a knife, and release the lever, dropping a perfectly domed patty with flat sides directly into the oil.
- The Two-Spoon Technique (The Home Method): If you do not own a specialized scoop, use two large soup spoons or a small 1.5-inch spring-loaded cookie scoop. Scoop up roughly two tablespoons of chilled dough. Use the second spoon to gently round the edges into an oval quenelle or smooth round ball.
- The Gentle Hand Shape: If using your hands, lightly wet your palms with cold water so the dough does not stick. Gently roll the dough between your palms into a golf-ball-sized sphere (roughly 1.5 inches across), then press down very lightly with your thumb to flatten it slightly into a thick disk. A slightly flattened disk cooks through to the center significantly faster than a perfectly round sphere.
- Sesame Crust Option: For authentic Jerusalem street-style flair, press one side of the shaped patty into a small dish of raw white sesame seeds before frying. The sesame seeds toast in the hot oil, adding an irresistible nutty crunch.
Frying Thermodynamics: The 365°F Precision
#Frying falafel is an exercise in heat transfer. If your oil is too cold, the falafel absorbs oil and collapses into a greasy sponge. If your oil is too hot, the exterior scorches black in ninety seconds while the raw chickpea center remains cold, pasty, and raw.
- Oil Selection: Use a neutral oil with a high smoke point (at least 425°F), such as peanut oil, canola oil, or refined sunflower oil. Never fry falafel in unrefined extra virgin olive oil, which burns at low temperatures and imparts a bitter flavor.
- Oil Depth: Pour at least 2.5 to 3 inches of oil into a deep, heavy-bottomed Dutch oven or cast-iron chicken fryer. The falafel patties must be completely submerged so they cook evenly on all sides without needing constant flipping.
- The Temperature Lock: Clip a digital probe or deep-fry thermometer to the side of the pot. Heat the oil over medium heat until it reaches exactly 365°F to 370°F (185°C).
- Batch Management: Never crowd the pot. Dropping six cold falafel patties into a pot drops the oil temperature by 20 to 30 degrees. Cook in small batches of four to five patties at a time.
- The 3 to 4 Minute Window: Gently lower the patties into the hot oil with a spider skimmer. They will sink for a few seconds, then float buoyantly to the surface as bubbles sizzle around them. Fry for 3.5 to 4 minutes, turning occasionally with your spider, until the exterior is a deep, rich mahogany-brown and crisped to the touch.
- The Drain Technique: Remove the fried falafel with your spider skimmer and transfer them immediately to a wire cooling rack set over a baking sheet. Never drain fried falafel on paper towels; paper towels trap hot escaping steam underneath, turning the crispy bottom shell soggy within two minutes. A wire rack allows circulating air to keep the crust shatteringly crisp on all sides.
Serving Traditions: Tarator Tahini and Warm Pita
#Authentic falafel should be served piping hot within ten minutes of frying:
- Creamy Tarator Tahini Sauce: The essential companion to falafel. In a bowl, whisk half a cup of raw Middle Eastern sesame tahini paste with the juice of one fresh lemon, one finely grated garlic clove, a pinch of sea salt, and a quarter cup of ice-cold water. Whisk vigorously; the tahini will seize initially, then transform into a snowy-white, velvety, pourable sauce.
- Pita Assembly: Warm a fresh pocket pita over an open flame until pillowy and pliable. Slit the top edge open. Smear a generous spoonful of tarator tahini across the interior walls. Stuff inside four freshly fried falafel patties, lightly crushing them with a fork so they break open into emerald-green clouds.
- Classic Accompaniments: Layer inside thin slices of ripe tomato, crunchy pickled wild cucumbers, tangy pink pickled turnips, a pinch of fresh mint leaves, and a dusting of ground sumac. Drizzle with extra tahini and spicy shug or harissa.
Troubleshooting Common Falafel Disasters
#- The Falafel Completely Broke Apart in the Oil: You used canned or boiled chickpeas, your oil temperature was below 350°F, or your dough was too wet. Ensure you use raw soaked chickpeas, check your oil with a thermometer, and chill the mixture for an hour before frying.
- The Outside Is Dark Brown but the Center Is Raw and Pastry-Like: Your frying oil was too hot (above 385°F), or your patties were shaped too thick. Lower the burner heat to maintain 365°F and shape patties into smaller, slightly flattened disks.
- The Falafel Is Dense, Heavy, and Chewy: You ran the food processor continuously, turning the mixture into a fine paste, or you forgot the baking powder. Keep the pulse rhythm short and granular, and ensure your baking powder is fresh.
- The Interior Is Pale Yellow Instead of Vibrant Green: You skimped on the herbs. A proper batch requires two massive bunches of fresh flat-leaf parsley and cilantro.
Once you taste the incredible contrast of a shatteringly crisp exterior yielding to a steaming, fragrant, emerald-green herb interior, you will never buy pre-packaged dry falafel mix or restaurant takeout again.