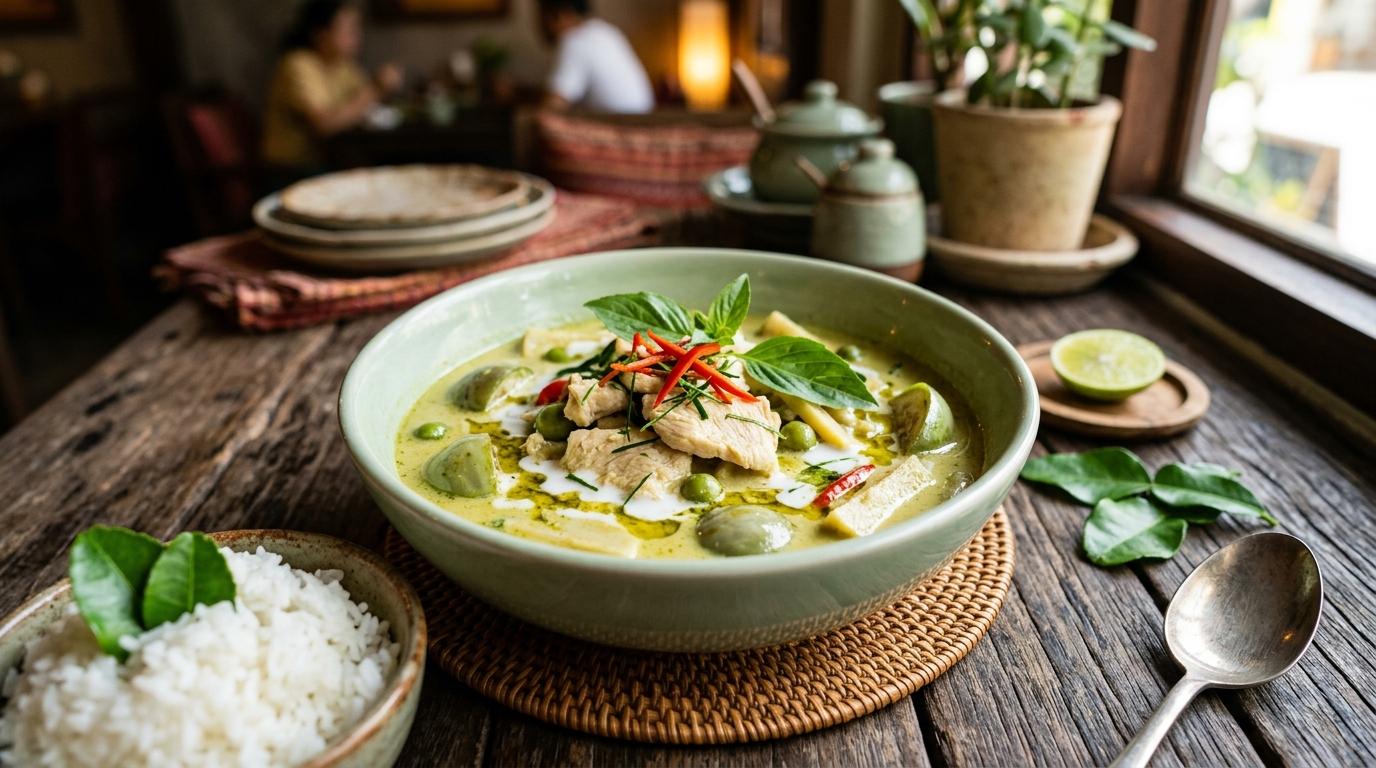
Authentic Thai green curry (Gaeng Kiew Wan) gets its rich taste and emerald color from one main technique: cracking thick coconut cream in a hot wok until clear oil separates, then frying your green curry paste directly in that oil. You do not need neutral cooking oil, and you never use heavy dairy cream.
When you do this right, you get a fragrant, slightly sweet, savory broth with tiny green oil droplets floating on top. When you skip this step and dump raw paste into boiling coconut milk, you end up with a pale, watery soup that tastes flat and raw.
Making real green curry at home takes less than 30 minutes once your ingredients are prepped.
The Secret Technique: Cracking Coconut Cream
#If you visit any street stall or family kitchen in Bangkok, you will never see the cook pour vegetable oil into the wok to start a green curry.
Instead, they crack the coconut cream:
- Do not shake the can of coconut milk before opening. The thick, solid cream will rise naturally to the top, while the thin coconut water settles at the bottom.
- Scoop out the top 1/2 cup of thick cream into a dry wok or heavy saucepan set over medium heat.
- Let it simmer for 3 to 5 minutes without rushing. As the water evaporates, the coconut milk breaks, and tiny beads of clear, glistening coconut oil will appear around the edges.
- Frying your green curry paste in this hot coconut oil blooms all the herbs and chilies instantly. It deepens the flavor and creates the signature glossy layer on the surface of your finished curry.
If you are using fresh pressed coconut milk from an Asian market, it cracks in just a couple of minutes. If you use canned milk, choose a brand with no gums or thickeners (like Aroy-D or Chaokoh) because emulsifiers can stop the fat from separating cleanly.
Key Ingredients for Real Thai Green Curry
#Traditional green curry relies on a handful of fresh aromatics and vegetables that give it a distinctive herbal punch.
1. The Green Curry Paste (Prik Gaeng Kiew Wan)
#The green color comes from fresh green bird's eye chilies, lemongrass stalks, sliced galangal, chopped cilantro roots, makrut lime peel, shallots, garlic, white peppercorns, toasted coriander seeds, and fermented shrimp paste (kapi). If you make your own paste in a granite mortar, you get the brightest color and aroma. If you use store-bought paste from a tub, you can easily wake it up by pounding in fresh lemongrass and grated galangal before cooking.
2. Chicken Thighs vs Chicken Breast
#Always pick boneless chicken thighs over chicken breast for green curry. Thigh meat stays juicy and absorbs the coconut sauce while simmering. Chicken breast tends to dry out and turn chalky in coconut broth.
3. Thai Eggplants and Pea Eggplants
#Traditional green curry uses golf-ball-sized round Thai eggplants (makhuea pro) and tiny pea eggplants (makhuea phuang). Round Thai eggplants have a firm, crunchy texture and soak up curry like a sponge without turning into mush. Pea eggplants look like little green berries and burst with a slightly bitter pop that cuts right through the rich coconut milk.
4. Fresh Makrut Lime Leaves and Thai Basil
#Never skip fresh makrut lime leaves (often called kaffir lime leaves) or fresh Thai sweet basil (horapha). Tear the lime leaves along their center stem so their citrus oils release into the broth. Add the Thai basil leaves right after turning off the stove burner so they wilt gently in the residual heat without turning black or bitter.
How to Balance the Flavors: Sweet, Salty, and Spicy
#Real Thai food is all about balance. Gaeng Kiew Wan translates literally to "sweet green curry," but the sweetness should be subtle and rounded, not like dessert.
Here is how you balance the pot:
- Salty and Umami: Use quality Thai fish sauce (like Red Boat, Megachef, or Tiparos). It provides deep savory saltiness that salt alone cannot match.
- Sweetness: Use shaved palm sugar. Palm sugar has a warm, caramel-like sweetness that softens the burn of the green chilies without making the sauce overly sugary.
- Heat: The heat comes from the fresh green chilies in the paste. If you prefer a milder curry, scrape out the seeds before making the paste or reduce the amount of paste by a tablespoon.
Recipe Overview & Timings
#- Prep Time: 15 minutes
- Cook Time: 15 minutes
- Total Time: 30 minutes
- Servings: 4 generous bowls
- Cuisine: Thai (Central Bangkok style)
- Course: Main Course
Ingredients
#- Chicken: 500g (1.1 lbs) boneless, skinless chicken thighs, cut into bite-sized strips
- Coconut Milk: 400ml can full-fat unsweetened coconut milk (unshaken)
- Green Curry Paste: 3 to 4 tablespoons authentic Thai green curry paste
- Chicken Stock: 250ml (1 cup) low-sodium chicken stock or water
- Thai Eggplants: 4 to 5 small round Thai eggplants, quartered
- Pea Eggplants: 1/2 cup pea eggplants (optional)
- Bamboo Shoots: 1/2 cup canned bamboo shoots, drained and rinsed
- Fish Sauce: 2 tablespoons authentic Thai fish sauce
- Palm Sugar: 1 tablespoon finely shaved palm sugar (or light brown sugar)
- Makrut Lime Leaves: 5 fresh leaves, center ribs removed, torn into pieces
- Thai Sweet Basil: 1 cup fresh Thai sweet basil leaves (Horapha)
- Fresh Red Chili: 1 red spur chili or red bell pepper, thinly sliced for garnish
- Jasmine Rice: Steamed jasmine rice, for serving
How to Make It Step by Step
#Follow this exact sequence to make authentic Thai green curry on your stovetop.
Step 1: Scoop and Crack the Coconut Cream
#Open the can of coconut milk carefully without shaking it. Spoon out 1/2 cup of the thick, dense white cream sitting at the top and place it into a large wok or wide pot over medium heat. Keep the remaining thin coconut milk in the can for later.
Let the cream bubble for 3 to 5 minutes, stirring occasionally. You will see steam rising as the water cooks off. Soon, small shiny droplets of clear oil will separate and float on the surface. That is cracked coconut cream.
Step 2: Fry the Curry Paste in Coconut Oil
#Turn the heat to medium-low. Add 3 to 4 tablespoons of green curry paste directly into the bubbling coconut oil.
Stir and fry the paste continuously for about 2 minutes. The raw smell of garlic and chilies will disappear, and your kitchen will fill with an intense herbal aroma. The paste will turn a deep, glossy green.
Step 3: Add the Chicken
#Add the sliced chicken thighs to the wok. Stir-fry for 2 to 3 minutes, turning the meat so every piece is coated in the hot paste. Cook until the outside of the chicken turns opaque. You do not need to cook it all the way through yet; it will finish cooking in the simmering broth.
Step 4: Pour in the Liquid and Simmer
#Pour in the remaining thin coconut milk from the can and 1 cup of chicken stock. Stir gently to lift any paste sticking to the bottom of the wok.
Bring the curry to a gentle simmer over medium heat. Do not let it boil violently, or the coconut milk can turn grainy.
Step 5: Add the Eggplants and Bamboo Shoots
#Toss in the quartered Thai eggplants, pea eggplants, and rinsed bamboo shoots. Submerge them into the simmering curry broth.
Cook gently for 6 to 8 minutes until the eggplants are tender when pierced with a fork and the chicken is cooked through.
Step 6: Season and Balance
#Add 2 tablespoons of fish sauce and 1 tablespoon of shaved palm sugar into the broth. Drop in the torn makrut lime leaves.
Stir well and let it simmer for 1 more minute so the flavors meld. Taste the sauce: it should lead with savory umami, followed by a mellow sweetness and a clean chili heat on the finish. If you want more salt, add another teaspoon of fish sauce. If it feels too spicy, add a small pinch of palm sugar.
Step 7: Fold in the Basil and Serve
#Turn off the stove burner completely. Immediately scatter the fresh Thai sweet basil leaves and sliced red chili strips over the curry.
Stir the basil into the hot broth just until it wilts—about 10 seconds. Leaving the stove off keeps the basil bright green and preserves its sweet licorice aroma.
Ladle the hot curry into shallow bowls and serve immediately alongside steaming jasmine rice.
Green Curry vs Red Curry vs Yellow Curry: The Differences
#Thai curries share a coconut base, but their color and flavor profiles come from different chilies and spices:
| Thai Curry | Primary Chili Base | Key Flavor Profile | Best Proteins | Heat Level |
|---|---|---|---|---|
| Green Curry (Gaeng Kiew Wan) | Fresh green bird's eye chilies | Herbal, fresh, slightly sweet; heavy on basil and lime leaf | Chicken, beef, firm tofu | Medium to Hot |
| Red Curry (Gaeng Phed) | Dried long red chilies | Earthy, savory, smoky, bold garlic and galangal | Roast duck, pork, beef | Medium |
| Yellow Curry (Gaeng Garee) | Dried yellow chilies, turmeric, curry powder | Warm, mild, aromatic with cumin and coriander notes | Chicken, potatoes, lamb | Mild to Medium |
| Panang Curry | Dried red chilies, roasted peanuts | Thick, nutty, rich, reduced coconut cream sauce | Sliced beef, pork | Mild to Medium |
How to Store and Reheat Leftover Green Curry
#Green curry tastes just as good the next day because the chicken absorbs more flavor overnight.
If you have leftovers, let the curry cool down to room temperature, then store it in a sealed glass or plastic container in the fridge for up to 3 days.
To reheat, pour the curry into a small pot and set it over medium-low heat. Stir occasionally until it is steaming hot. If the sauce has thickened up in the fridge, stir in 2 tablespoons of water or chicken stock to loosen it back into a smooth broth. Avoid microwaving on high heat, which can cause the coconut fat to separate into an oily layer.