If you want a turkey with truly crispy skin and juicy breast meat that does not take four exhausting hours in the oven, spatchcock it. You cut out the backbone, press the breastbone until it cracks flat, and roast it on a wide sheet pan in roughly 80 minutes.
Every year people stress over roasting a whole, bowling-ball-shaped turkey. The breast meat sits high up and cooks fast, while the thick thigh joints stay cold down in the cavity. By the time the dark meat is safe to eat, the white meat is chalky and dry.
Flattening the bird fixes the geometry. Both the white and dark meats sit in the exact same horizontal plane, so heat hits everything evenly. Plus, all the skin faces upward into direct heat instead of sitting steamed and soggy in deep roasting pan juices.
Here is the straightforward, step-by-step way to spatchcock a turkey at home with confidence.
Why Whole Turkeys Cook Unevenly
#Think about the shape of an intact turkey. It is essentially a hollow sphere with two different types of muscle that need completely different internal cooking temperatures.
Lean turkey breast meat is tender and easily dried out once it goes past 160°F (71°C). Thighs and drumsticks are rich in tough collagen and connective tissue, meaning they need to hit at least 165°F to 175°F (74°C to 79°C) to turn soft and juicy.
When you roast a bird upright in a deep pan, the high-sitting breast meat absorbs intense heat from the top of your oven. Meanwhile, the dark meat is buried down between the legs and pan sides, shielded from radiant heat. You end up waiting for the legs to finish while your breast meat dries to sawdust.
Spatchcocking changes the physics entirely:
- Single cooking plane: The thighs rotate outward and sit along the perimeter where heat in a sheet pan is strongest, while the delicate breast stays in the center.
- Direct air circulation: Air flows unimpeded across the entire surface rather than trapping pockets of cool steam inside an enclosed cavity.
- Uniform skin exposure: Every square inch of skin faces toward the heating element, yielding unbroken, golden crunch.
Essential Tools You Actually Need
#You do not need specialty equipment or a butcher's certificate. You just need a few basic kitchen tools that can handle cutting through poultry bones cleanly.
- Heavy-duty poultry shears: Ordinary desk scissors or thin paper shears will bend and hurt your hands. Invest in sturdy, spring-loaded kitchen shears with notched stainless steel blades.
- Large rimmed baking sheet: A standard half-sheet pan (18 by 13 inches) works best. Do not use an unrimmed cookie sheet or melted fat will spill over into your oven.
- Wire cooling rack: Resting the turkey on a rack inside the sheet pan lets dry heat circulate underneath the skin.
- Paper towels: Dry skin is the secret to crisp skin. You will need plenty of towels to wipe down the surface before seasoning.
- Instant-read digital meat thermometer: This is non-negotiable. Cooking by clock time guarantees either dry meat or undercooked joints; cooking to exact internal temperature guarantees perfection.
Step 1: Prep and Safety Checks
#Start by clearing your workspace. Move cutting boards away from clean dishes, and set out a roll of paper towels and your shears before touching the raw meat.
First, check that your bird is completely thawed. A frozen core makes cutting the backbone impossible and causes dangerous slips. A 12 to 14-pound turkey needs about three full days in the refrigerator to thaw through to the bone.
Reach into both the main body cavity and the smaller neck opening. Pull out the neck bone, the bag of giblets, and any plastic or metal hock clips holding the legs together. Do not throw the neck or giblets away—toss them into a saucepan with an onion and celery to simmer an effortless rich stock for your gravy.
Never rinse the raw turkey under running tap water in the sink. Washing poultry does not kill surface bacteria; it simply splashes droplets across your countertops, sponges, and clean dishes. Instead, place the bird directly on your cutting board and pat it dry with paper towels.
The Backbone Cut: Where to Place Your Shears
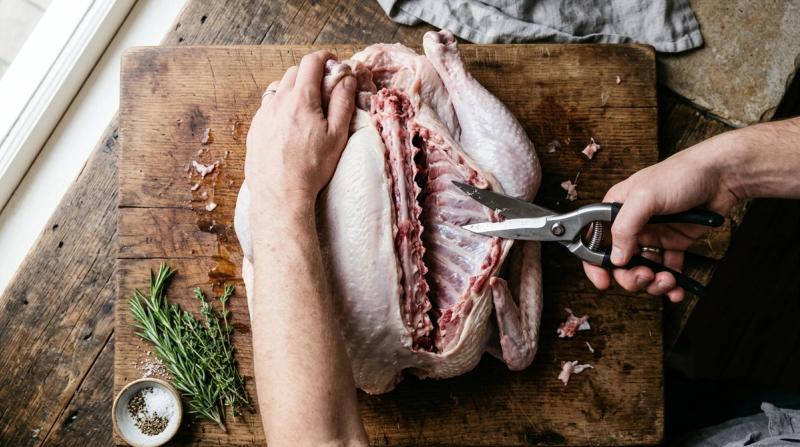
#Place the turkey breast-side down on your cutting board, with the legs pointing toward you and the neck opening pointing away. Feel down the middle of the back to locate the long, rigid ridge of the spine.
You will make two continuous cuts, one along each side of this central backbone, roughly half an inch to three-quarters of an inch away from the center ridge.
Pick up your shears with your dominant hand. Start at the tail end, slide the lower blade inside the body cavity just to the right of the spine, and begin cutting forward through the thin rib bones. Keep your cuts straight and steady.
If you hit a tough joint near the thigh connection, do not force the shears with tiny jerky snips. Reposition the blades deeper into the hinge of the shears where leverage is strongest, and apply firm, steady pressure.
Once you cut completely through to the neck on the first side, spin the cutting board or reposition your hands. Cut down the left side of the spine from tail to neck in the same manner.
Lift the freed backbone out completely. Save it alongside the neck in your stock pot. You will now see the interior cavity exposed with the underside of the breastbone visible in the center.
Step 2: The Flattening Crack
#Flip the turkey over so it now sits skin-side up on your cutting board. The legs will be splayed slightly outward, but the bird will still sit somewhat arched and rounded.
To get it truly flat, you need to break the central breastbone cartilage.
Place the heel of one hand firmly on the center of the breastbone, right between the two breast halves. Place your second hand directly over the first hand, interlock your fingers, and lean your upper body weight directly downward over the board.
Press down with a swift, assertive push. You will hear and feel a distinct, satisfying crack as the cartilage yields and the wishbone structure flattens outward.
Once broken, run your hands across the top of the turkey. It should sit completely level and flat across your board, with the breast halves and thighs resting at nearly identical heights.
Finish the butcher prep by tucking the wing tips behind the shoulders. Fold each wing tip back and down underneath the upper breast; this prevents the thin tips from burning during high-heat roasting and keeps the bird neat on the pan.
Step 3: Seasoning and Herb Butter Under the Skin
#Great flavor starts with seasoning the meat directly, not just dusting the surface of the skin.
Slide your fingers gently between the skin and the meat at the top of the breast. Work your fingers downward slowly to separate the connective tissue without tearing the skin. This creates a pocket where you can rub seasoned fat straight onto the lean meat.
Mix six tablespoons of softened unsalted butter with two minced garlic cloves, a tablespoon of chopped fresh rosemary, a tablespoon of fresh thyme, black pepper, and a teaspoon of kosher salt.
Scoop half of this herb butter into the pocket over each breast half, and massage it through the skin until the butter spreads evenly across the meat.
For the skin itself, rub a thin layer of olive oil or neutral oil over the entire exterior. Oil transfers heat efficiently from the oven air directly into the skin fats. Season the exterior generously with coarse kosher salt.
If you have 12 to 24 hours before cooking, apply the principles of dry brining principles by leaving the seasoned, flattened bird uncovered on a wire rack inside your refrigerator overnight. The salt draws out surface moisture, dissolves into a concentrated brine, reabsorbs deep into the muscle fibers, and leaves the skin parchment-dry for blistering crunch.
Step 4: Roasting and Temperature Checks
#Preheat your oven to 425°F (220°C). High heat is what makes spatchcocking shine; because the bird is flat, you can blast it with high heat to crisp the skin without scorching the exterior before the inside cooks through.
Place your wire rack inside a heavy, rimmed half-sheet pan. Lay the spatchcocked turkey skin-side up on the rack, positioning the thighs and drumsticks angled outward toward the corners of the pan where heat is most intense.
Slide the pan into the middle rack of your oven with the legs facing toward the back wall, as the back of most home ovens runs slightly hotter than the door side.
A 12 to 14-pound spatchcocked turkey typically roasts in 70 to 85 minutes at 425°F. Start checking internal temperatures with your digital probe thermometer at the 60-minute mark.
Insert the probe into the thickest part of the breast, making sure the metal tip does not touch bone. Then insert it into the deepest part of the thigh joint, avoiding bone.
Pull the turkey out of the oven when:
- The breast registers 150°F to 155°F (65°C to 68°C).
- The thigh registers at least 165°F (74°C).
Do not wait for the breast to reach 165°F in the oven. While resting on the counter, carryover cooking will raise the internal temperature another 5 to 8 degrees, bringing the breast to an ideal, juicy 160°F without drying out a single fiber.
Step 5: Resting and Carving
#Transfer the turkey on its wire rack to your counter and let it rest undisturbed for 20 to 25 minutes before slicing.
If you carve immediately, hot internal steam escapes, muscle proteins tighten, and flavorful meat juices run all over your cutting board instead of staying inside the meat. A brief rest allows the juices to thicken and redistribute throughout the muscle grain.
Carving a flat turkey is substantially easier than struggling with a hot, wobbly whole bird:
- Remove the leg quarters: Slice through the skin connecting the thigh to the breast. Pull the leg back and pop the hip joint out of its socket, then cut clean through the joint to separate the drumstick and thigh together.
- Separate thighs and drumsticks: Find the small fat line running between the thigh and drumstick, and slice directly through the knee joint.
- Remove whole breast lobes: Instead of shaving thin, awkward slices off the carcass, slice downward along one side of the center breastbone with a long carving knife. Follow the rib cage down to remove the entire half-breast lobe in one solid piece. Repeat on the other side.
- Slice across the grain: Place the whole boneless breast lobes flat on your cutting board and cut them crosswise into half-inch thick, succulent medallions, each carrying a crisp ribbon of top skin.
Whole Roast vs Spatchcock Comparison
#To see why this method has taken over modern home kitchens, look at how the two approaches compare across practical points:
| Feature | Whole Traditional Roast | Spatchcocked Turkey |
|---|---|---|
| Average Cook Time (12-14 lb) | 3 to 4 hours | 70 to 85 minutes |
| Roasting Temperature | 325°F to 350°F (165°C to 175°C) | 425°F to 450°F (220°C to 230°C) |
| Breast vs Thigh Cooking | Breast overcooks while thighs finish | Breasts and thighs finish simultaneously |
| Skin Texture | Crispy on top, pale and soggy underneath | 100% crispy, golden skin all over |
| Oven Space Required | Tall, bulky roasting pan taking whole oven | Flat half-sheet pan leaving upper racks free |
| Carving Ease | Awkward, wobbly angles on a hot carcass | Fast, clean removal of boneless breast lobes |
| Built-in Gravy Base | Neck only | Neck, backbone, and wing tips for rich stock |
Common Mistakes and Quick Fixes
#Even with a simple technique, small missteps can happen. Keep these checks in mind to guarantee smooth cooking:
- Using weak scissors: Trying to cut poultry bones with everyday utility scissors is frustrating and unsafe. If your shears struggle, take the turkey to your butcher counter and ask them to remove the backbone for you. Most butchers will gladly do it in thirty seconds for free.
- Forgetting to dry the skin: If your turkey goes into the oven wet with water or meat fluids, the oven heat spends the first 30 minutes evaporating surface steam instead of crisping the fats. Pat the skin dry with paper towels until the paper comes away clean.
- Letting fat burn in the pan: At 425°F, turkey drippings falling onto a bare, dry metal pan can scorch and smoke. Scatter roughly chopped onions, carrots, and celery onto the baking sheet underneath the wire rack. The vegetable moisture keeps drippings from smoking while creating a savory foundation for pan sauce.
- Skipping the thermometer: Color is not an indicator of doneness. An exterior skin rub can look dark golden brown at 50 minutes while the meat near the bone is still undercooked. Always verify internal temperature with a calibrated digital probe thermometer.
Spatchcocking takes less than ten minutes of prep, cuts your cooking time in half, and guarantees everyone at the table gets juicy meat and crunchy skin. Once you roast a turkey flat, you will never go back to the old four-hour guesswork again.