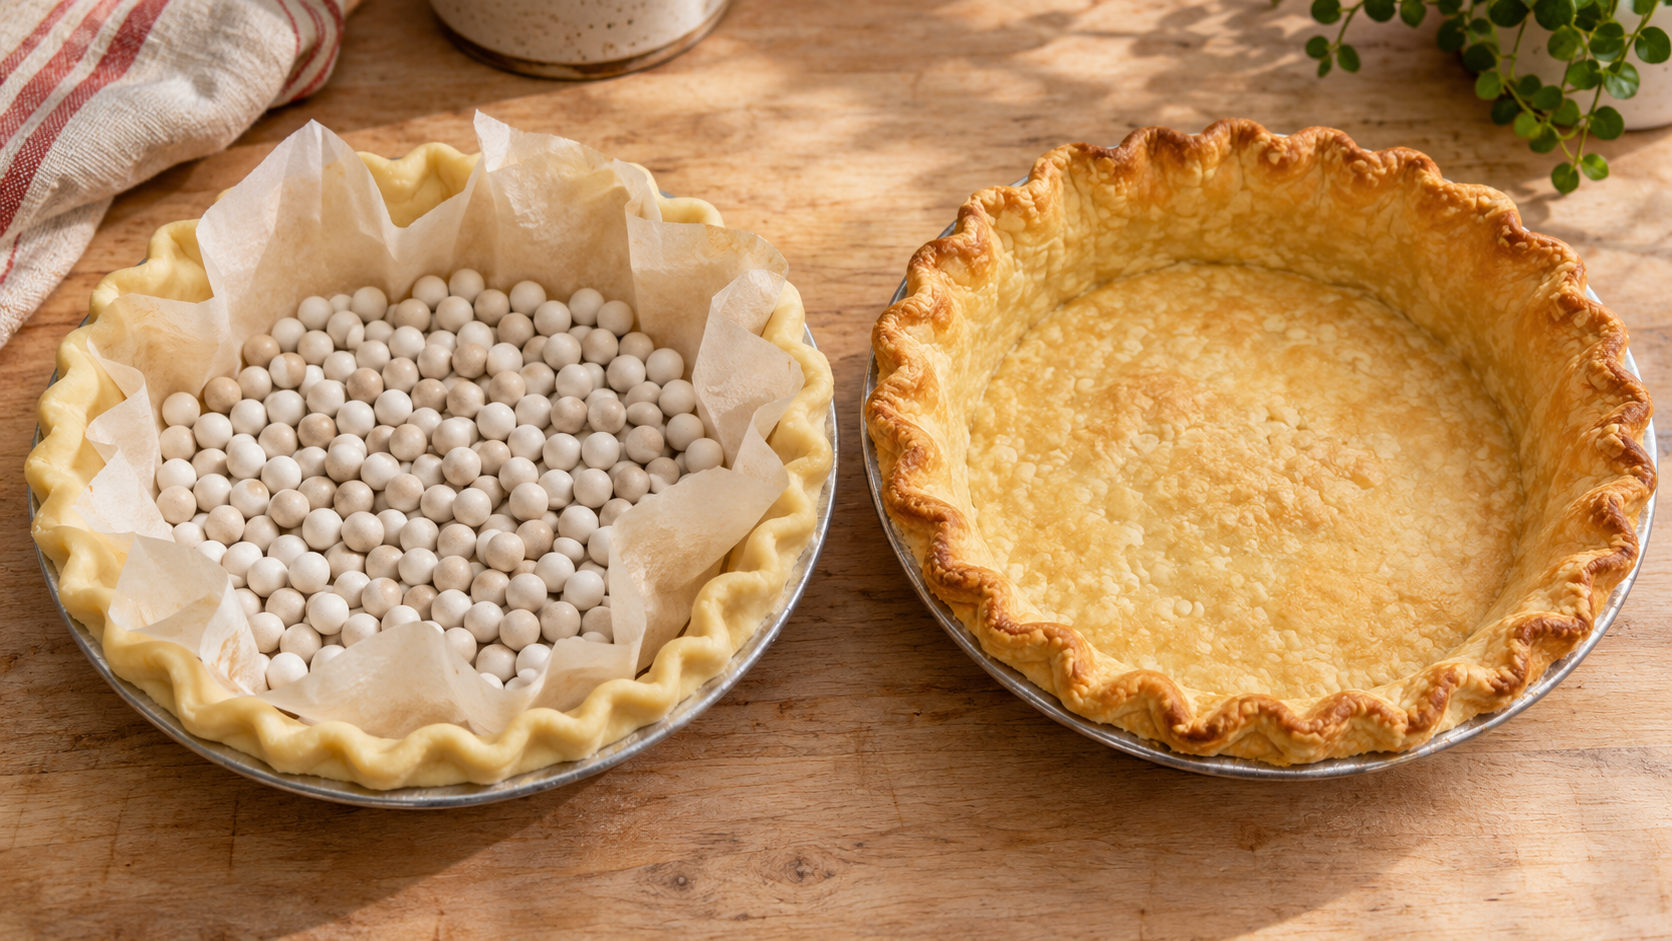
Blind bake a pie crust when the filling will go in cold or needs less time in the oven than the pastry. Bake the shell all the way through for a no-bake filling. Give it a head start for a filling that will finish in the oven, if the recipe calls for one.
The easiest way to decide is to read the filling instructions before you roll out the dough. A banana cream pie and a pumpkin pie may start with the same empty shell, but you should stop baking that shell at different points. A double-crust fruit pie can have a different plan again. The filling tells you which job the crust has to do.
Decide how far to bake it before you start
#Blind baking means baking the empty pastry shell before adding the filling. People also call it prebaking. Par-baking is the partial version. Recipe authors sometimes use “blind bake” for both partial and full baking, so read the next sentence in the recipe. That sentence usually resolves the ambiguity.
| What happens to the filled pie | What the shell needs | Example |
|---|---|---|
| The filled pie goes straight to the fridge | A fully baked shell, cooled as directed | Banana cream pie |
| The filling goes into the oven but needs a gentler or shorter bake | A partially baked shell if the recipe calls for it | A custard pie or quiche |
| Dough and filling bake together for the full recipe time | Follow the assembled-pie method | A traditional double-crust apple pie |
For the cream pie, the shell has to taste and feel done before you add anything. The fridge can set the filling. It cannot brown pale pastry. For a custard pie, the second bake does some of that work. You are trying to get the pastry far enough ahead that the custard can finish without having to wait for a raw base.
Sometimes two recipes for the same kind of pie give different instructions. One pumpkin pie may call for a prebaked shell and another may use a different baking schedule designed for raw dough. Follow the dough, pan and filling instructions as a set. Borrowing a temperature from one recipe and a stopping point from another can leave you without a clear way to tell when either part is ready.
Fit the dough into the dish without pulling it tight
#Roll the dough large enough to cover the base, line the sides and leave the edge your recipe calls for. Lower it into the pan, lift the loose edge with one hand and ease the pastry into the corner with the other. You want it resting against the pan all the way around. If you push it into the corner while pulling on the rim, you stretch the piece you need to stay in place.
Look at that corner before crimping. A gap can hide under the dough even when the top looks neat. It leaves an unsupported section that can sag when the pastry softens. Settle the dough into the dish first, then tidy the rim. If one side is short, redistribute the pastry while you can still lift it. Pulling that side up to match the rest can set you up for uneven shrinkage.
Check the dish against the recipe. A shallow tin and a deep pie plate can have the same diameter across the top and need different amounts of pastry. A different dish material can also change the browning you see. Start with the pan the recipe was written for, especially when you are learning how its pastry behaves. If the pan changes, watch the crust rather than assuming an identical clock time.
Chill the shaped shell while the oven heats
#Read the chilling instructions for both the dough and the lined dish. Chilling the rolled-out shell helps the fat firm back up and gives the dough time to relax after shaping. If rolling and crimping took longer than expected in a warm kitchen, the tray going into the oven may be much softer than the dough was when it came out of the fridge.
A useful check is the rim. If it is soft enough to lose its shape when you gently move the dish, put the shell back in the fridge for the time your recipe specifies. Give the oven time to reach the temperature too. The pastry should enter an oven ready for the bake, with the liner and weights already in place.
Avoid transferring a cold dish to high heat if its maker warns against that temperature change. Follow the cookware instructions alongside the pastry recipe. A handy metal pan that matches the recipe can be easier to manage here than improvising with an unfamiliar glass dish.
Give the sides support as well as the bottom
#Line the shaped pastry with oven-safe parchment or the liner specified by your recipe. Leave enough overhang to get a safe hold when the weights come out. Ease the liner against the base and walls rather than balancing it on the top. Fill with suitable pie weights so they reach up the sides. A little pile only in the middle can hold down the centre while leaving the walls free to slide.
| Weight | Where it helps | What to check |
|---|---|---|
| Ceramic pie weights | Reusable support across the base and sides | One small pack may leave a deep shell partly unsupported |
| Dry beans or uncooked rice | Pantry substitutes used in documented methods | Keep them in the liner and set them aside for future baking use |
| A pie chain | Can hold down part of the base | It may leave most of the sides exposed |
| Granulated sugar | Can fill the liner evenly in methods designed for it | It can be harder to lift and reuse after heating |
The number that matters is coverage in your pan. Two people can follow the same recipe with different pie plates and find they need different amounts to support the walls. Look across the shell from the side. If there is a large stretch of loose liner above the weights, check whether that area needs more support.
Get a heatproof bowl or tray ready before the pie goes in. The liner and contents will be hot when you lift them out, and loose weights can roll or spill. This is a much easier thing to solve with an empty counter than while you are holding a hot pouch over soft pastry.
Bake with the weights until the shell can hold itself
#Put the shell into the preheated oven and follow the first stage of your chosen method. The weights stay in place while the sides set. The uncovered rim gives you the first clue. Look for an edge that has started to set and shows the colour described by the recipe. Deep browning at this point can leave the rim ahead of the base.
Sally McKenney’s published method for her chilled 9-inch shell uses an oven at 375°F, about 190°C, and checks the edges after roughly 15 to 16 minutes with the weights. That is one documented example of the sequence, including what the edges look like at the handoff. Treat the temperature and timing as part of that method. The same article gives a different second-stage time depending on whether the crust goes back with a filling. Other doughs and dishes may need a different schedule.
If the rim looks set and the centre looks paler when you lift the liner, you have learned something useful about how the heat reached the pastry. The covered base commonly needs more oven time. It is easy to take one look at the rim and think the whole shell is done. Judge the base separately before pouring anything in.
Take the weights out and finish the base
#Set the pan on a stable, heatproof surface. Use oven gloves and lift the liner with care, keeping the weights low and over the tray or bowl you prepared. If the liner is catching, take a moment to free it. A quick pull can tear soft pastry or tip the weights. Keep the hot weights well away from people reaching across the counter.
Some methods have you prick small holes in the base after removing the weights. That is called docking. Other recipes dock before lining the shell or give different instructions for the filling they use. Follow the chosen method. Weights and docking serve related jobs, but tiny holes in the base do little to support a tall wall that has no weight against it.
Return the uncovered shell to the oven as directed. For a partial bake, look for the base to set and reach the colour or texture the filling recipe asks for. For a cream pie shell, look for even baking and a golden base as well as a coloured edge. When the shell needs more time and the edge is already browning quickly, use a pie shield only if the recipe and cookware allow it, and keep watching the exposed base.
Cooling depends on what comes next. For a typical no-bake cream filling, let the fully baked shell cool completely unless the recipe says otherwise. For a filling that goes back to bake, the recipe may tell you to fill a warm shell. Put that instruction on your work plan ahead of time. It tells you when to mix the filling and whether a cooling rack or a clear path straight back to the oven is the next thing you need.
Read a failed shell by where it went wrong
#| What you see | What to check first | What to change on the next bake |
|---|---|---|
| Side walls slide down into the pan | Was the dough stretched, warm or unsupported high up the wall? | Fit it loosely, chill after shaping and spread the weights out to the walls |
| A bubble rises in the middle | Did the liner sit close to the base and did you follow the docking step? | Follow the recipe's order and use enough weight across the base |
| The rim is coloured and the base is pale | Was the bake stopped before the uncovered base finished? | Judge both areas and follow the second stage for your filling |
| One edge drops farther than the other | Was the dough thinner, shorter or pulled tighter on that side? | Check the fit and thickness before crimping |
| The cooled shell is soft after filling | Was the base baked enough for the recipe and filled at the right point? | Check the full bake and cooling instructions before changing the dough |
A shell that has slumped below the intended filling line may still have a use. If it is baked as required and remains sound, you could choose an amount of filling that safely fits, or bake again when presentation or depth matters. Do not pour the original full amount into a shell that can no longer hold it. The recipe's filling depth can affect how it sets, so a changed shape may also call for a different recipe plan.
If the pastry leaks fat, looks greasy, or loses most of its edge, write down what changed before guessing why. Record your pan, when you chilled the shell, how high the weights came, and what the centre looked like when they came out. Changing one factor on the next attempt makes the result easier to understand.
Plan a partial shell and a full shell from the same shopping list
#Imagine making a baked quiche for lunch and a cream pie for later. Both recipes call for one prepared shell. For the quiche, bring the pastry to the specified partial endpoint and have the filling ready for its bake. For the cream pie, leave time for the uncovered base to finish and enough time for the shell to cool before you fill it. If you only have one set of weights, bake the shells in sequence and let the weights reach a temperature you can handle safely before setting up again.
With packaged pastry, check whether you have raw chilled dough, a raw frozen shell, or a shell sold already baked. The package tells you how that product can be heated or thawed. The filling recipe tells you what kind of shell it expects when you add the filling. If the instructions do not fit together, choose a shell or recipe meant for the other. A frozen raw crust is still raw pastry, even though it arrives in a dish.
A make-ahead plan is helpful when it follows a documented storage method for your dough or shell. Read the recipe's storage and filling instructions before you decide whether to shape the shell ahead or bake it ahead. In particular, keep a cream-filled pie under its filling recipe's refrigeration guidance. An empty baked shell and a dairy-filled pie have different storage needs.
When you are ready to fill, check the base and sides one last time. Can the shell hold the amount of filling the recipe calls for? Is the base at the right stage? Is the shell at the right temperature? These three checks tell you whether to pour, cool, or give the pastry more time before your filling goes anywhere near it.